
To kick off this whole website thing I’m going to start with a small post on how to use a custom font with Xamarin.Forms. I’m going to cover both the “old” way of adding custom fonts and the new and improved method that was added in Xamarin.Forms 4.5.530.
First off, download the custom font that you want to use, I’m going to use Roboto Mono from Google Fonts but feel free to use any font that you desire.
Before Xamarin.Forms 4.5.530
1. Add the font to your platform projects
Once downloaded, you need to add the font to the platform projects. Each platform has its own way of importing custom fonts but they are very straightforward to do:
iOS
For iOS add the font file to the Resources folder under the iOS project, making sure that the build action for the file is set to BundleResource. After adding the font you’ll need to update the Info.plist so that the app can use the custom font:
|
1 2 3 4 |
<key>UIAppFonts</key> <array> <string>RobotoMono-Regular.ttf</string> </array> |
Android
For Android add the font file to the Assets folder under the Android project, making sure that the build action for the file is set to AndroidAsset.
2. Create a reusable resourse
To make life easier and remove duplication every time you want to use the custom font in a particular control we’re going to set up an OnPlatform resource within the application’s resource dictionary.
x:Keyis the name of the resource entry, this will be used whenever you want to reference this resource on a control.- For iOS
Valueis the name of the font - For Android
Valueis the filename of the font plus the name of the font
|
1 2 3 4 5 6 7 8 |
<Application.Resources> <ResourceDictionary> <OnPlatform x:Key="RobotoMonoRegular" x:TypeArguments="x:String"> <On Platform="iOS" Value="Roboto Mono"/> <On Platform="Android" Value="RobotoMono-Regular.ttf#Roboto Mono"/> </OnPlatform> </ResourceDictionary> </Application.Resources> |
3. Use the font
Once you have defined the OnPlatform resource above you can simply use it to set the FontFamily of a control:
|
1 2 3 |
<Label FontFamily="{StaticResource RobotoMonoRegular}" Text="Welcome to Xamarin.Forms!"/> |
Xamarin.Forms 4.5.530 or newer
1. Add the font to your Xamarin.Forms ‘shared’ project
Since Xamarin.Forms 4.5.530 there is no longer a need to add custom fonts to all platform projects, instead it should be added to your main Xamarin.Forms .netstandard ‘shared’ project and have a Build Action of EmbeddedResource. The font file can be placed in any folder within the project and will be picked up automatically as long as it has the correct build action.
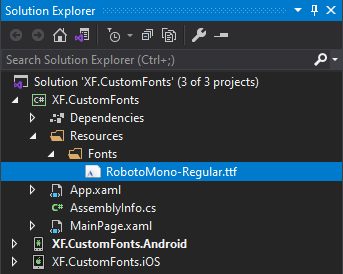
Project resource directory 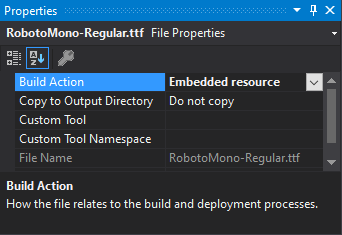
File properties
Note that when using an embedded font it is not necessary to to edit the iOS info.plist!
2. Register the font
Before you can use your custom font on an actual control it needs to be “exported” using the ExportFont assembly attribute. As the attribute is an assembly level attribute it’s common to put it in a file such as AssemblyInfo.cs, however, I tend to put it at the top of my App.xaml.cs file so that it is more visible when looking at the code.
|
1 |
[assembly: ExportFont("RobotoMono-Regular.ttf", Alias = "RobotoMono-Regular")] |
Although optional I’d always recommend setting an alias so there is no confusion as to the value that should be used when setting a FontFamily.
3. Use the font
Once exported you can simply use the Alias that you set as the FontFamily on the desired control.
|
1 2 3 |
<Label FontFamily="RobotoMono-Regular" Text="Welcome to Xamarin.Forms!"/> |
Screenshots

Default Xamarin.Forms font 
RobotoMono-Regular font
Repo

XF.CustomFonts (this link opens in a new window) by chowarth (this link opens in a new window)
Sample project that shows how to use custom fonts within a Xamarin.Forms application